Stitch
the motif according to the design, including the
stitching around the whole motif. Cut around the square leaving 1 cm of
margin on the outside for the assembly. Cut a square of fabric the same
size as the stitched square plus 1 cm.
Borduur
het hele motief zoals aangegeven op het patroon, evenals de steken
rondom het gehele motief. Knip ze uit met een rand van
ongeveer 1 cm voor het inelkaar zetten. Knip ook een vierkant uit stof
met dezelfde grootte als het motief plus ongeveer 1 cm.
Pliez les rebords autour du motif le long de la ligne et marquer le pli. Pliez les rebords du tissu assorti également jusqu'à il a la même taille que le carré brodé.
Fold
the borders around the design along the line and mark them. Fold the
borders of the assorted fabric as well until it has the same size as the
embroidered square.
Vouw
de randjes om rond het motief langs de lijn en strijk ze. Vouw de
randen van de bijpassende stof ook om tot het dezelfde grootte heeft als
het geborduurde vierkant.
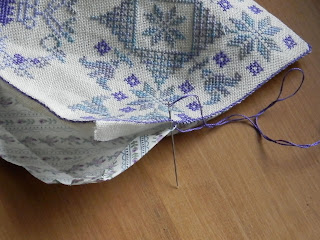
Assemblez les rebords des 2 carrés en passant votre aiguille, de haut en bas, par dessous puis par dessus les points de piqûres. Réalisez de petits points, à une cote par passer à travers la toile et à l'autre cote par passer en dessous de la piqûre du cadre, en gardant une tension dans le fil sans pour autant trop le tendre.
Assemble
the 2 squares by passing the needle down, under the stitch, through the
fabric and then
over to the next stitches. Make these stitches while going
through the fabric on one side and going under the borderstitch on the
other side, while keeping some tension on the thread, but not too
much.
Naai
de 2 vierkanten samen door de naald van boven naar beneden onder de
randsteek en door de stof steken en vervolgens over die steken naar de
andere kant te
bewegen. Maak deze steken door aan de ene kant door de stof te steken en
aan de andere kant onder de randsteek te gaan, terwijl je
spanning op de draad houdt, maar niet teveel.
Poursuivre à l'angle et continuez d'assembler les 2 carrés jusqu'à la fermeture complétée.
Continue
in the corners and go on to stitch the 2 squares together until finishing to close completely.
Ga door in de hoeken en blijf de 2 vierkanten samen naaien tot ze helemaal aan elkaar genaaid zijn.
Pliez maintenant 2 cotés l'un contre l'autre comme montré sur la photo.
Réalisez vous qu'il y a deux façons de faire cela (voyez les photos en-dessous): essayez les deux et décidez vous-même......
Now fold 2 sides against eachother as shown on the picture.
Realise that there are two ways of doing this (see photos below): try them both and decide for yourself....
Vouw nu 2 zijkanten tegen elkaar zoals op de foto te zien is.
Realiseer je dat hier twee manieren voor zijn (zie de foto's hieronder): probeer ze beiden en neem je eigen besluit.....

Avec des petites piqures dans les piqures de fermetures vous fermez les 2 cotés pliés.
With small stitches in the closing stitches you close the 2 foldes sides.
Met kleine steekjes in de sluitsteken sluit je de 2 gevouwen zijkanten.
Après avoir éventuellement ajouté un pompon au bout, il faut qu'on décide sur la fermeture de l’étui. Soit vous mettez une petite corde au sommet avec un bouton au milieu des cotés fermés (voir photos en bas), soit vous mettez un bouton pression (plus facile).
If you want you can embellish it with a tassel at the bottom. Now we have to decide on how to close the scissor case. Either you put a little cord at the top with a button in the middle of the closed sides (see photo below), or you put on a press button (easier).
Nadat je eventueel een kwastje hebt toegevoegd aan de onderkant, wordt het tijd om over de sluiting te beslissen. Of je maakt een klein koordje aan de bovenkant vast en maakt een knoop vast middenop de sluitingsnaad, of je naait er een drukknoop op (makkelijker).


Merci pour cette classe de couture!
RépondreSupprimerà bientôt!!!
mille merci !!!!!!!! depuis le temps que je cherche un modèle clair.
RépondreSupprimerJe t'en prie ! Est-ce que tu veux m'envoyer une photo de ton étui dès que c'est fini ?! Merci d'avance !
Supprimer