Pochette à mouchoirs / Tissue holder / Zakdoek etui

Pour la grille de broderie utilisé dans ce tutoriel, voir ICI.
For the embroidery pattern used in this tutorial, see HERE.
Voor het borduurpatroon dat in deze werkbeschrijving wordt gebruikt, kijk HIER.


Coupez votre broderie jusqu'à 6" x 7" = 15 x 17,5 cm et le tissu pour l'intérieur (et la bordure) jusqu'à 6" x 8" = 15 x 20 cm

Cut your embroidery to 6" x 7" and your lining fabric (and trim) to 6" x 8"

Knip het borduurwerk tot 6" x 7" = 15 x 17,5 cm en de stof voor de voering (en het randje) tot 6" x 8" = 15 x 20 cm

Ensuite il faut coudre les côtés court ensemble avec les tissus placés endroit contre endroit, jusqu'à obtention d'un tunnel comme ceci.

Then you have to stitch the short sides together with the right sides of the fabric together, until you have a tunnel like this.

Vervolgens stik je de korte zijden samen met de goede kanten van de stof tegen elkaar, tot je een tunnel als deze hebt.

Tournez le tunnel et repassez du milieu à l'extérieur, et vous obtenez une bordure à chaque côté.

Turn the tunnel inside out and press from the middle to the side to get a trim on either side.

Draai de tunnel binnenste buiten en strijk van het midden naar de buitenkant tot je een randje aan elke kant hebt.

Maintenant il faut plier les extrémités jusqu'au milieu, comme sur la photo.

Now you have to fold the extremities to the middle, as shown in the picture.

Nu moet je de uiteinden naar het midden vouwen, zoals op de foto te zien is.
Les côtés ouvertes sont cousu fermé avec un point droit et ensuite avec un point zig zag, pour empêcher le tissu de s’effilocher (ou si ta machine a un point qui fait ça tout de suite, tant mieux !)

The open sides are stitched closed with a straight stitch and the with a zigzag stitch, to keep the fabric from fraying (or if your machine can do this at the same time, it's even better !)

De open zijden worden dichtgestikt met een rechte steek en dan met een zigzag steek, om te voorkomen dat de stof gaat rafelen (of als jouw machine dat tegelijk kan, deste beter !)


Tournez l'endroit vers l'extérieur, ensuite un petit coup de repassage....

Turn the right side out, then press it until nice and flat.....

Draai de goede kant naar buiten, strijk het geheel goed glad.....


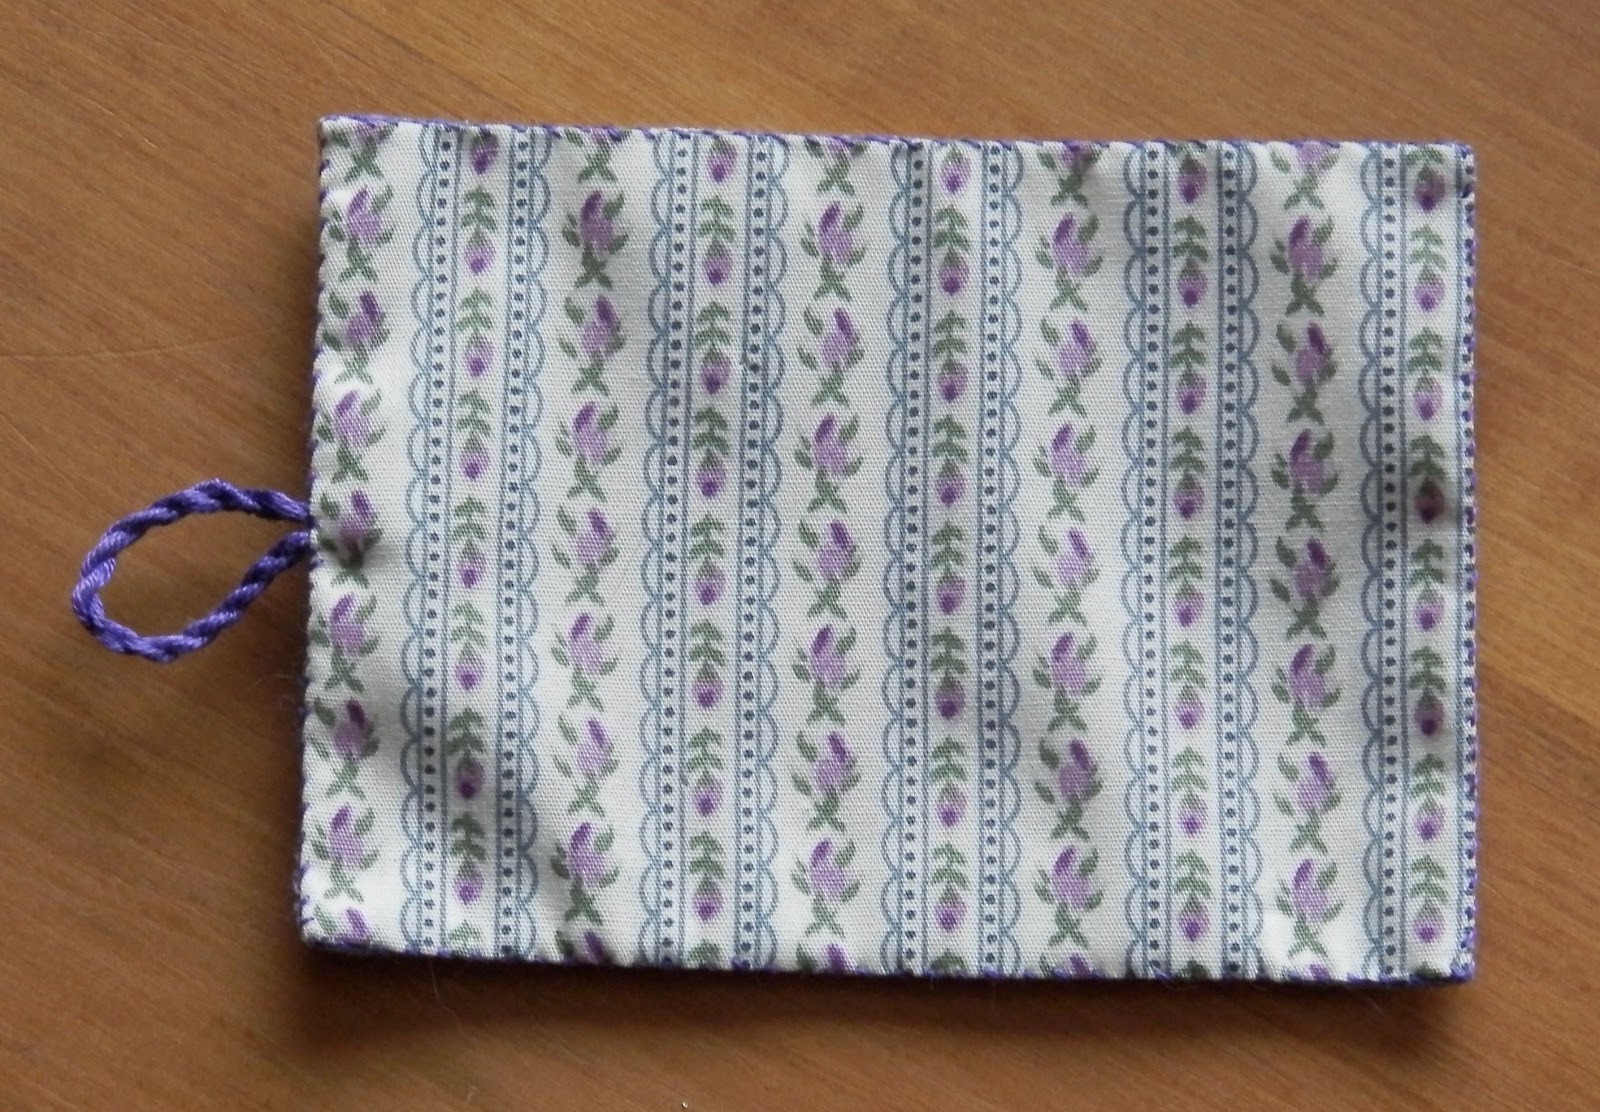
Remplissez la pochette avec vos mouchoirs en papier favorits, et le tour est joué !

Fill the tissue holder with your favourite paper tissues, and it's ready !

Vul het etui met je favoriete papieren zakdoeken, en het is klaar !


Pique épingle carré / Square pincushion / Vierkant Speldenkussen

Broder l'ensemble du motif du recto et du verso, y compris le contour au point de piqûre.
Couper autour du cadre en laissant environ 1 cm de marge à l'extérieur de la ligne pour l'assemblage.

Stitch the complete motif of the front and the back side, including the stitching around the whole motif.
Cut around the square leaving 1 cm of margin on the outside for the assembly.

Borduur het hele motief voor de voor- en de achterkant, evenals de steken rondom het gehele motief.  Knip ze uit met een rand van ongeveer 1 cm voor het inelkaar zetten.
Assemblez les rebords des coins en passant votre aiguille, de haut en bas, par dessous puis par dessus les points de piqûres de chacun des carrés. Réalisez de petits points, sans passer à travers la toile, en gardant une tension dans le fil sans pour autant trop le tendre.

Assemble the corners by passing the needle down, under the stitches and then over to the next couple of stiches. Make these stitches without going through the cloth, while keeping some tension on the thread, but not too much.
Naai de hoeken samen door de naald van boven naar beneden onder de randsteken en vervolgens over die steken naar de volgende randsteken te bewegen. Maak deze steken zonder in de stof te steken, en terwijl je spanning op de draad houdt, maar niet teveel.
Après avoir fait ça aux 4 coins on aura ça...

After having done this to the 4 corners you're left with this....

Na dit gedaan te hebben met de 4 hoeken is de bovenkant zo....
Poursuivez l'assemblage par coudre le fond ensemble avec la partie supérieur dans la même manière

Continue the assembly by stitching the bottom to the top in the same way

Ga verder door de bodem samen te naaien met de bovenkant op dezelfde manier
 Interrompez la couture quelques centimètres avant le point de départ. Il vous faut une ouverture suffisante pour ajouter le bourrage. Après avoir inséré le bourrage, complétez la couture pour fermer entièrement le biscornu. Passez votre aiguille à travers le biscornu et réalisez un noeud pour bloquer le fil. Ne laissez pas de fil visible.

Stop stitching multiple centimeters before the starting point. You'll need an opening ample enough for filling. After putting the filling in, finish stitching by closing the biscornu completely. Put your needle a little way through the biscornu and make a knot. Don't leave any visible thread.

Stop het samen naaien enkele centimeters voor het startpunt. Je hebt een opening nodig die groot genoeg is om te vullen. Nadat de vulling erin is gedaan, kun je doorgaan met dichtnaaien tot de biscornu geheel gesloten is. Maak een knoopje aan het einde en werk deze onzichtbaar weg. Laat geen draadje zichtbaar uitsteken.
Maintenant vous avez un petit coussin carré. Choisissez 2 boutons assortis à votre broderie. Fixez les boutons en les cousant au centre de chaque face, en passant votre aiguille à travers le coussin, d'un bouton à l'autre, avec un fil bien tendu.

Now you have a square little cushion. Choose 2 buttons fitting you stitching. Fix them by stitching them in the middle of each square, threading your needle all the way through the cushion from one button to the next with a thread under a lot of tension.

Nu heb je een klein vierkant kussentje. Kies 2 knopen die bij het borduurwerk passen. Maak ze in het midden van ieder vierkantje vast, door de naald helemaal door het kussentje te steken van een knoop naar de andere, met een draad met veel spanning erop.


Blackwork : Point Holbein


Et on commence au début du blackwork: le point Holbein ! Bien sur, on peut faire du blackwork avec un point arrière, mais le point traditionnel est le point Holbein. L'avantage du point Holbein est que le travail de face sera pareil que le travail du dos et la broderie sera alors utilisable pour des vêtements ou on voit la face et le dos (aux manches d'un chemise par exemple). De faire le point Holbein sur une broderie est toujours un peu un puzzle. Il faut regarder d'abord comment on va faire notre 'chemin' d'aller, pour revenir après le 'chemin' de retour sur le même endroit du début. Regardez les dessins, ça explique beaucoup !
Point Holbein / Holbein stitch / Holbein steek


Point arrière / Back stitch / Stiksteek
And we start at the beginning of blackwork: the Holbein or double running stitch ! You can of course do blackwork in backstitch, but the traditional stitch is the Holbein stitch. The advantage of the Holbein stitch is that your work will be the same on the front and the back, so you can use it for clothing where the front and the back are visible (like sleeves on a blouse for instance). To do the Holbein stitch is always a bit of a puzzle. You first have to figure out what your 'route' going out is going to be, to take the same 'route' back to end in the same spot you started from. Look at the pictures, it will explain a lot !


Trouver ton chemin / Finding your route / Vind je route
En we beginnen bij het begin van blackwork: de Holbein steek ! Natuurlijk kun je ook blackwork met een stiksteek doen, maar de traditionele steek is de Holbein steek. Het voordeel van de Holbein steek is dat het werk aan de voor- en aan de achterkant gelijk is, dus bruikbaar voor kleding waarvan de voor- en achterkant te zien zijn (bijvoorbeeld de mouwen van een blouse). Het maken van Holbein steken kan soms een beetje een puzzel zijn. Allereerst moet je je 'route' voor de heenweg plannen, om dan de terugweg te borduren om terug te komen op het startpunt. Kijk maar naar de plaatjes, dat legt het goed uit !


Biscofleur

Commence par suivre les premiers stages de l'assemblage comme pour le biscornu 15 faces jusqu’à l'obtention du stage avec 10 carrés assemblés et 5 carrés assemblés. Si tu veux pendre ta biscofleur, il faut attacher une corde maintenant.

Start by following the first steps of the assembly of the 15 sided biscornu until the stage with 10 squares assembled and 5 squares assembled. If you want to hang your biscoflower than you have to attach a cord now.

 Begin met het volgen van de eerste stappen van de werkbeschrijving voor de 15 kantige biscornu tot het stadium met 10 vierkantjes samen en 5 vierkantjes samen. Als je later je biscofleur wilt ophangen, moet je nu een koordje bevestigen.

Maintenant pour le stage qui est différent que le biscornu: on attache une pointe a une pointe pour obtenir des petits pyramides au lieu d'une forme arrondie.

And now for the stage that's different than the biscornu: you attach a point to a point to obtain little pyramids in stead of a rounded form.

En nu het verschil met een biscornu: je maakt een punt vast aan een punt om zo kleine pyramide-achtige vormpjes te krijgen in plaats van een afgeronde vorm.
Comme pour le biscornu on pause une carré avant la fin pour le remplir.

Like a biscornu you have to pause a square before the end to fill it up.

Net als bij een biscornu moet je een vierkantje voor het einde pauzeren om het op te vullen.


Si vous voulez, vous pouvez, comme pour un biscornu, encore attacher un bouton (ou une petite cloche) au milieu pour rétrécir la forme encore plus.

If you want, you can attach a button (or a little bell) in the middle, as you would for a biscornu, to retract the form even more.

Als je wilt, kun je, net als bij een biscornu, nog een knoop (of een belletje) in het midden vastmaken, om de vorm nog scherper te maken.

Etui a ciseaux / Scissor case / Schaar-etui

Brodez le motif selon la grille, les piqûres du bord inclus. Coupez avec environ 1 cm de marge autour du cadre. Coupez un carré de tissu du même taille que le motif plus environ 1 cm.


Stitch the motif according to the design, including the stitching around the whole motif. Cut around the square leaving 1 cm of margin on the outside for the assembly. Cut a square of fabric the same size as the stitched square plus 1 cm.

Borduur het hele motief zoals aangegeven op het patroon, evenals de steken rondom het gehele motief.  Knip ze uit met een rand van ongeveer 1 cm voor het inelkaar zetten. Knip ook een vierkant uit stof met dezelfde grootte als het motief plus ongeveer 1 cm.


Pliez les rebords autour du motif le long de la ligne et marquer le pli. Pliez les rebords du tissu assorti également jusqu'à il a la même taille que le carré brodé.

Fold the borders around the design along the line and mark them. Fold the borders of the assorted fabric as well until it has the same size as the embroidered square.

Vouw de randjes om rond het motief langs de lijn en strijk ze. Vouw de randen van de bijpassende stof ook om tot het dezelfde grootte heeft als het geborduurde vierkant.

Assemblez les rebords des 2 carrés en passant votre aiguille, de haut en bas, par dessous puis par dessus les points de piqûres. Réalisez de petits points, à une cote par passer à travers la toile et à l'autre cote par passer en dessous de la piqûre du cadre, en gardant une tension dans le fil sans pour autant trop le tendre.

Assemble the 2 squares by passing the needle down, under the stitch, through the fabric and then over to the next stitches. Make these stitches while going through the fabric on one side and going under the borderstitch on the other side, while keeping some tension on the thread, but not too much.

Naai de 2 vierkanten samen door de naald van boven naar beneden onder de randsteek en door de stof steken en vervolgens over die steken naar de andere kant te bewegen. Maak deze steken door aan de ene kant door de stof te steken en aan de andere kant onder de randsteek te gaan, terwijl je spanning op de draad houdt, maar niet teveel.


Poursuivre à l'angle et continuez d'assembler les 2  carrés jusqu'à la fermeture complétée.

Continue in the corners and go on to stitch the 2 squares together until finishing to close completely.

Ga door in de hoeken en blijf de 2 vierkanten samen naaien tot ze helemaal aan elkaar genaaid zijn.

Pliez maintenant 2 cotés l'un contre l'autre comme montré sur la photo.
Réalisez vous qu'il y a deux façons de faire cela (voyez les photos en-dessous): essayez les deux et décidez vous-même......

Now fold 2 sides against eachother as shown on the picture.
Realise that there are two ways of doing this (see photos below): try them both and decide for yourself....

Vouw nu 2 zijkanten tegen elkaar zoals op de foto te zien is.
Realiseer je dat hier twee manieren voor zijn (zie de foto's hieronder): probeer ze beiden en neem je eigen besluit.....


Avec des petites piqures dans les piqures de fermetures vous fermez les 2 cotés pliés.

With small stitches in the closing stitches you close the 2 foldes sides.

Met kleine steekjes in de sluitsteken sluit je de 2 gevouwen zijkanten.


Après avoir éventuellement ajouté un pompon au bout, il faut qu'on décide sur la fermeture de l’étui. Soit vous mettez une petite corde au sommet avec un bouton au milieu des cotés fermés (voir photos en bas), soit vous mettez un bouton pression (plus facile).

If you want you can embellish it with a tassel at the bottom. Now we have to decide on how to close the scissor case. Either you put a little cord at the top with a button in the middle of the closed sides (see photo below), or you put on a press button (easier).

Nadat je eventueel een kwastje hebt toegevoegd aan de onderkant, wordt het tijd om over de sluiting te beslissen. Of je maakt een klein koordje aan de bovenkant vast en maakt een knoop vast middenop de sluitingsnaad, of je naait er een drukknoop op (makkelijker).


Range-aiguille / Needlebook / Naaldenmapje

Brodez le motif selon la grille, les piqûres du bord inclus. Coupez avec environ 1 cm de marge autour du cadre. Coupez une rectangle de tissu du même taille que le motif plus environ 1 cm. Préparez également une rectangle de feutrine plus petit que le motif brodé, une petite corde/ruban et un bouton.

Stitch the motif according to the design, including the stitching around the whole motif. Cut around  leaving 1 cm of margin on the outside for the assembly. Cut a rectangle of fabric the same size as the stitched square plus 1 cm. Prepare also a rectangle of felt smaller than the stitched motif, a cord/ribbon and a button.

Borduur het hele motief zoals aangegeven op het patroon, evenals de steken rondom het gehele motief.  Knip ze uit met een rand van ongeveer 1 cm voor het inelkaar zetten. Knip ook een rechthoek uit stof met dezelfde grootte als het motief plus ongeveer 1 cm. Leg ook klaar: een rechthoek van vilt kleiner dan het borduurwerk, een koordje/lintje en een knoop.

Pliez les rebords autour du motif le long de la ligne et marquer le pli. Pliez les rebords du tissu assorti également jusqu'à la même taille que le rectangle brodé.


Fold the borders around the design along the line and mark them. Fold the borders of the assorted fabric as well until it has the same size as the embroidered square.

Vouw de randjes om rond het motief langs de lijn en strijk ze. Vouw de randen van de bijpassende stof ook om tot het dezelfde grootte heeft als het geborduurde vierkant.

 
Préparez une aiguillée de fil avec 1 ou 2 brins. Faire un nœud au bout du fil. Assemblez les rebords des 2 rectangles en passant votre aiguille, de haut en bas, par dessous puis par dessus les points de piqûres. Réalisez de petits points, à une cote par passer à travers la toile et à l'autre cote par passer en dessous de la piqûre du cadre, en gardant une tension dans le fil sans pour autant trop le tendre. Poursuivre à l'angle et continuez d'assembler les 2 rectangles.

Prepare a needle with 1 or 2 strands of thread. Make a knot at the end. Assemble the 2 rectangles by passing the needle down, under the stitch, through the fabric and then over to the next stitches. Make these stitches while going through the fabric on one side and going under the borderstitch on the other side, while keeping some tension on the thread, but not too much. Continue in the corners and go on to stitch the 2 rectangles together.

Zorg dat je een naald hebt met 1 of 2 draden. Maak een knoopje aan het uiteinde.
Naai de 2 vierkanten samen door de naald van boven naar beneden onder de randsteek en door de stof steken en vervolgens over die steken naar de andere kant te bewegen. Maak deze steken door aan de ene kant door de stof te steken en aan de andere kant onder de randsteek te gaan, terwijl je spanning op de draad houdt, maar niet teveel. Ga door in de hoeken en blijf de 2 vierkanten samen naaien.


N'oubliez pas d’insérer dans un des cotés court la corde/le ruban.

Don't forget to put the cord/ribbon in one of the short sides.

Vergeet niet in een van de korte kanten het koordje/lintje in te voegen.


Après d'avoir fini la fermeture, cachez le nœud. Puis attacher le bouton à l'extérieur, au milieu du coté court opposé de la corde/du ruban.

After having finished closing, hide the end knot. Then attach the button on the outside, in the middle of the short side opposite the cord/ribbon.

Nadat het geheel gesloten is, verberg de eindknoop. Maak dan het knoopje aan de buitenkant vast, in het midden van de korte kant aan de overkant van het koordje/lintje.


Mettez votre pièce de feutrine au milieu à l’intérieur et attachez-le avec des petites piqures au milieu, de haut en bas. Le résultat sera comme un petit livre avec deux feuilles de feutrine.

Lay your piece of felt in the middle on the inside and attach it with little stitches in the middle, from top to bottom. The result should be like a little book with two leaves of felt.

Leg je stukje vilt in het midden aan de binnenkant en bevestig dit met kleine steekje in het midden, van boven naar beneden. Het resultaat is als een boekje met twee vilten bladzijden.


Piquez des aiguilles dans les feuilles de feutrine.
Pliez le livre au milieu et attachez la corde au bouton.


You can now prick you needles in the felt leaves.
Fold it in the middle and attach the cord to the button.


Je kunt nu jouw naalden in de vilten bladzijden steken.
Vouw dan het geheel dubbel in het midden en maak het koordje vast met de knoop.


Bijou de ciseaux


Broder l'ensemble du motif du recto et du verso, y compris le contour au point de piqûre. Les 2 cadres doivent être exactement la même taille.
Couper autour du cadre en laissant environ 1 cm de marge à l'extérieur de la ligne pour l'assemblage.
Préparez votre pompon et votre cordelette / ruban.

Stitch the complete motif of the front and the back side, including the stitching around the whole motif. The 2 squares should be the same size.
Cut around the square leaving 1 cm of margin on the outside for the assembly.
Prepare you tassel and your cord / ribbon.

Borduur het hele motief voor de voor- en de achterkant, evenals de steken rondom het gehele motief. De 2 vierkanten moet precies even groot zijn. Knip ze uit met een rand van ongeveer 1 cm voor het inelkaar zetten. Leg ook een pompon en een koordje / lintje klaar.


Plier les rebords le long de la ligne et marquer le pli.

Fold the borders along the line and mark them.

Vouw de randjes om langs de lijn en strijk ze.


Mettez les dos du motifs l'un contre l'autre.
Préparez une aiguillée de fil avec 1 ou 2 brins. Faire un nœud au bout du fil. Commencez par le coté du haut et assemblez les rebords des 2 carrés en passant votre aiguille, de haut en bas, par dessous puis par dessus les points de piqûres de chacun des carrés. Réalisez de petits points, sans passer à travers la toile, en gardant une tension dans le fil sans pour autant trop le tendre.

Put the 2 back sides against eachother.
Prepare a needle with 1 or 2 strands of thread. Make a knot at the end. Start with the top side and assemble the 2 squares by passing the needle down, under the stitches and then over to the next couple of stiches. Make these stitches without going through the cloth, while keeping some tension on the thread, but not too much.

Leg de 2 achterkanten tegen elkaar.
Zorg dat je een naald hebt met 1 of 2 draden. Maak een knoopje aan het uiteinde.
Begin met de bovenkant en naai de 2 vierkanten samen door de naald van boven naar beneden onder de randsteken en vervolgens over die steken naar de volgende randsteken te bewegen. Maak deze steken zonder in de stof te steken, en terwijl je spanning op de draad houdt, maar niet teveel.

N'oubliez pas d’insérer votre cordelette / ruban au milieu de votre cote du haut. Si vous faites un nœud à la fin de votre cordelette / ruban, il va rester coincé sur ce nœud.

Don't forget to put your cord / ribbon in the middle of your top side stitching. If you make a knot at the end of you cord / ribbon, it will stay stuck on this knot.

Vergeet niet om je koordje / lintje in het midden van de bovenkant in te voegen. Als je een knoop maakt aan het einde van je koordje / lintje, dan blijft het daar op vast zitten.


Poursuivre à l'angle et continuez d'assembler les 2 lignes. Insérez au coté bas votre pompon comme la cordelette.

Continue in the corners and go on to stitch the 2 lines together. Insert on the bottom your tassel like you did for the cord.

Ga door in de hoeken en blijf de 2 lijnen samen naaien. Voeg aan de onderkant de pompon in op dezelfde manier als het koordje.


Interrompez la couture après le 3ème coté. Il vous faut une ouverture suffisante pour ajouter le bourrage.
Après avoir inséré le bourrage, complétez la couture pour fermer entièrement le biscornu. Passez votre aiguille à travers le biscornu et réalisez un nœud pour bloquer le fil. Ne laissez pas de fil visible.

Stop stitching after the 3rd side. You'll need an opening ample enough for filling.
After putting the filling in, finish stitching by closing the biscornu completely. Put your needle a little way through the biscornu and make a knot. Don't leave any visible thread.

Stop het samen naaien na de 3e kant. Je hebt een opening nodig die groot genoeg is om te vullen.
Nadat de vulling erin is gedaan, kun je doorgaan met dichtnaaien tot de biscornu geheel gesloten is. Maak een knoopje aan het einde en werk deze onzichtbaar weg. Laat geen draadje zichtbaar uitsteken.


Voila, un bijou de ciseaux! 

And look, a scissor fob!

Kijk, een schaarkussentje!